
Documentation
Samar - Creative Agency React Template
Samar is a popular WebApp template for multi purpose use . It’s responsive React template, which is based on the Bootstrap framework. It utilizes all of the Bootstrap components in design and re-styles many commonly used plugins to create a consistent design that can be used in all type of business an organisations website.
- Skype: rahulxarma
- Gmail: dexignzones@gmail.com
- Slider
- Portfolio
- Key Feature
- News Letter
- Pricing Plan
- Testimonial
- Query Form
- FAQ
- Contact Form
- Style Varient
- Social
- Blog Style
- Coming Soon Page
- Error Page
- Blog Page
- Site Down page
React.JS Installation & Setup A JavaScript library for building user interfaces.
Install npm: Run
npm install command from your project
directory. It will create 'node_module' folder in this all
dependency files will be install with this command.
Run Project: Run
npm run dev command from your project directory.
With is command file will be compiled and it will be loaded
on local server `http://localhost:5000`.
Production Build: Run
npm run build Builds the app for production to
the `build` folder. It correctly bundles React in production
mode and optimizes the build for the best performance.
Further help: To get more help on the Next.js checkout Next.js
Note: You can learn more in the Create React App Documentation. To learn Next.js, check out the Next.js Documentation.
<!-- START CONTENT -->

import React from 'react';
import Slider from "react-rangeslider";
import "react-rangeslider/lib/index.css";
import "slick-carousel/slick/slick-theme.css";
import "slick-carousel/slick/slick.css";
import "../css/style.css";

  function MyApp({ Component, pageProps }) {
    return(
  	<div className="App">
  	  <Component {...pageProps} />
  	</div>
    );
  }
export default App;

<!-- END CONTENT -->
{
 "name": "samar",
 "version": "0.1.0",
 "private": true,
 "scripts": {
   "dev": "next dev -p 5000",
   "build": "next build",
   "start": "next start",
   "sass": "node-sass --watch scss/main.scss css/style.css --source-map css/style.css.map"
 },
  "dependencies": {
    "moment": "^2.29.1",
    "next": "^10.0.6",
    "node-sass": "^5.0.0",
    "react": "^17.0.1",
    "react-bootstrap": "^1.5.0",
    "react-countup": "^4.3.3",
    "react-dom": "^17.0.1",
    "react-google-recaptcha": "^2.1.0",
    "react-modal-video": "^1.2.6",
    "react-rangeslider": "^2.2.0",
    "react-router-dom": "^5.2.0",
    "react-scroll-to-top": "^1.0.5",
    "react-slick": "^0.28.0",
    "react-visibility-sensor": "^5.1.1",
    "simple-react-lightbox": "^3.6.6",
    "slick-carousel": "^1.8.1",
    "use-scroll-position": "0.0.4",
    "wowjs": "^1.1.3"
  }
}
Create a PageHow to create a custom page
1. Create page pages\blank.js
function Blank() {

export function MyPage() {
  return(
   <h1>Hello!</h1>
  )
}
export default Blank;
RoutingLinking between pages
The Next.js router allows you to do client-side route transitions between pages, similar to a single-page application.
A React component called Link is provided to do this client-side route transition.
import Link from 'next/link'

function Home() {
  return(
	<ul>
	   <li>
		<Link href="/">
		  <a>Home</a>
		</Link>
	   </li>
	   <li>
		<Link href="/about">
		  <a>About Us</a>
		</Link>
	   </li>
	   <li>
		<Link href="/blog/hello-world">
		  <a>Blog Post</a>
		</Link>
	   </li>
	</ul>
  )
}
export default Home;
In the example above we have multiple links, each one maps a path (href) to a known page:
- / → pages/index.js
- /about → pages/about.js
- /blog/hello-world → pages/blog/[slug].js
Any in the viewport (initially or through scroll) will be prefetched by default (including the corresponding data) for pages using Static Generation. The corresponding data for server-rendered routes is not prefetched.
Vercel (Recommended) Getting started
If you haven’t already done so, push your Next.js app to a Git provider of your choice: GitHub, GitLab, or BitBucket. Your repository can be private or public.
Then, follow these steps:- Sign up to Vercel (no credit card is required).
- After signing up, you’ll arrive on the “Import Project” page. Under “From Git Repository”, choose the Git provider you use and set up an integration. (Instructions: GitHub / GitLab / BitBucket).
- Once that’s set up, click “Import Project From …” and import your Next.js app. It auto-detects that your app is using Next.js and sets up the build configuration for you. No need to change anything — everything should work just fine!
- After importing, it’ll deploy your Next.js app and provide you with a deployment URL
- To get more help on the deployment checkout Deployment
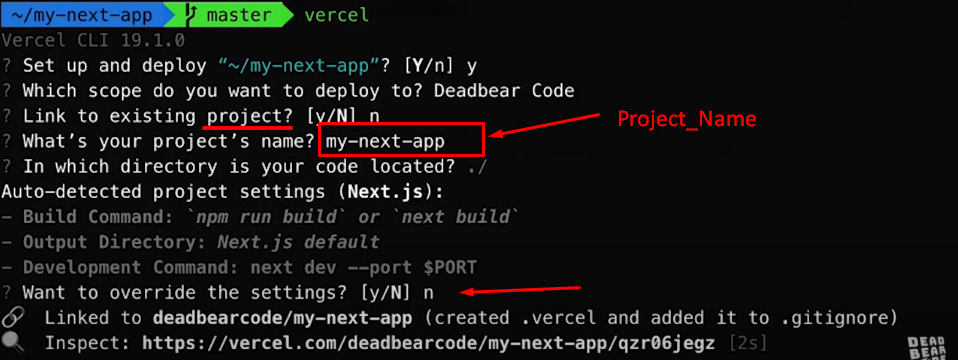
Step-1: Run npm i -g vercel

Step-2: Check version vercel --version

Step-3: login in vercel vercel login

Step-4: write your mail abc@example.com

Step-5:
Now, answer some questions
1. do you want deploy project on vercel.
2. Link to existing project?
3. write your project name.
4. In which directory is your code located?
- .next
- .vercel
- project.json
- component
- css
- element
- icons
- flaticon
- flaticon-old
- font-awesome
- line-awesome
- themify
- layout
- header.js
- footer.js
- pages
- api
- _app.js
- index.js
- blank.js
- error-404.js
- coming-soon.js
- other-pages.js
- public
- images
- about
- background
- banner
- blog
- icon
- logo
- main-slider
- move
- pattern
- pricingtable
- projects
- team
- testimonials
- logo.png
- favicon.ico
- images
- abstracts
- base
- components
- layout
- footer
- header
- pages
- animate
- aos
- bootstrap-select
- bootstrap-v4-rtl
- deznav
- metismenu
- perfect-scrollbar
- Moment Js: Click to See
- Next Js: Click to See
- Node Sass: Click to see
- React Bootstrap Click to See
- React Count Up Click to See
- React Google Re-captcha Click to See
- React Modal Video Click to See
- React Range Slider Click to See
- React Scroll to top Click to See
- React Slick Click to See
- React Visibility Sensor Click to See
- React Slick Carousel Click to See
Once again, thank you so much for purchasing this template. As I said at the beginning, I'd be glad to help you if you have any questions relating to this template.
REGULAR SUPPORT : You have in template support if you face any issue with the usage of it then you can contact us on below Email ID.
EXTENDED SUPPORT : Development it is chargeable according to your requirement. For that you need to mail us your requirement on below Email ID.
COST OF SERVICE : Depends on the hours required. But as you are already using our template we have discounted rates for our template customer.
EXTENDED LICENSE : With the Extended Support we also include Extended License. So you save much more with your investment than you will with purchasing Regular License and later buying Extended one + Development cost.
You will get a quick reply from our team and feel free to contact us. We don’t charge for requirement discussion so don’t worry.
Contact Us : rahulxarma@gmail.com
Skype : rahulxarma